
How to Process and Transform Data
- Topics covered:
- How data is processed in Instalink
- Transform Data Action
- Transform Fields
- Data types
- Incoming and Outgoing data formatting.
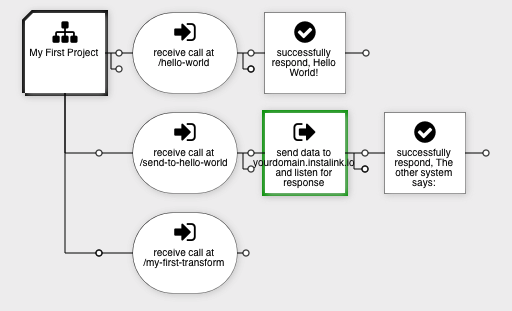
In the previous tutorial, “How to Connect My Endpoint to Another System”, you learned how to send HTTP calls to external services. Now we're going to take this a step farther by transforming inbound data. We'll also introduce decision logic and have our process do different actions depending on the data our endpoint receives.
Let's Pass Data to an Endpoint
- Log back in to the Instalink admin panel. Then open up the same project we worked on in the previous tutorials: “My First Project”.
- We're going to add a new data flow to our project. To create our new flow, click on the Insert After node for the action titled “My First Project”. The Insert After node is the small circle that comes down from the connecting line between the actions.
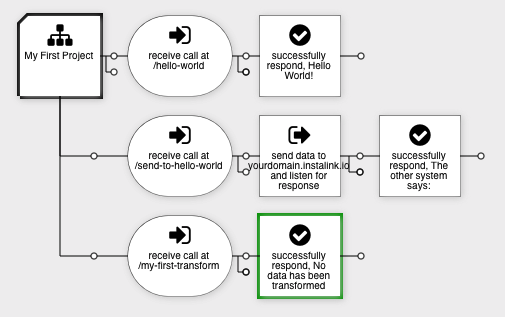
- Set the new action to the following:
Operator = if
Action = Listen to Request
Custom Endpoint Alias = my-first-transform
- Now add a “Respond with Success” action after the the listen action we just created. Set the action properties as follows:
Operator = then
Action = Respond with Success
Format = Plain Text
Message = data transform: ${input}
- Open your endpoint in a new browser window. Your endpoint should be:
https://yourdomain.instalink.io/my-first-transform
- You should see the following response:
"data transform: undefined"
- Of course, “undefined” is the expected response because we never sent in a key value called “input”. Let's do that with appending the following query in your URL as follows:
https://yourdomain.instalink.io/my-first-transform?input=test+data
- Now you should see the following as your response.
"data transform: test data"
- Hey, we're seeing the same data that we passed into the request appearing in the response. That's exactly what we would expect because we didn't do any modifications to the data. In this example, anything you type into your query will appear in the response.
- This is demonstrating how Instalink endpoints work on a fundamental level. Any data that gets sent into an endpoint is available to be read or mutated by any action that operates upon such data. This data is not just limited to simple HTTP queries. Every common HTTP method including POST can also be processed. Additionally, files and stream buffers can also be processed. For now, in this tutorial, we'll keep things simple.
What's up with the response formatting?
- You may or may not have noticed that our response, while being exactly what we would expect, isn't exactly very useful for other systems to process. We'll need to adjust the response format to make our response easier to ingest by computers.
- Go to the “Respond with Success” action that we just created. Let's change the following:
Format = Plain Text
- If you go back to your endpoint in your browser you'll now see:
data transform: test data
- Notice that the quotation marks have disappeared. Previously we had the format set to JSON which is a common syntax for sending object data between internet systems. Plain Text makes no attempt to post-process your output data. It also updates the mime type to be txt/plain. All the other available formats will also adjust the mime type accordingly.
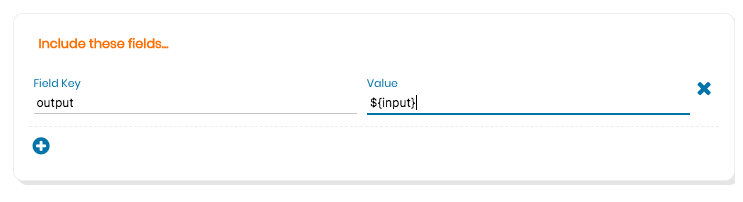
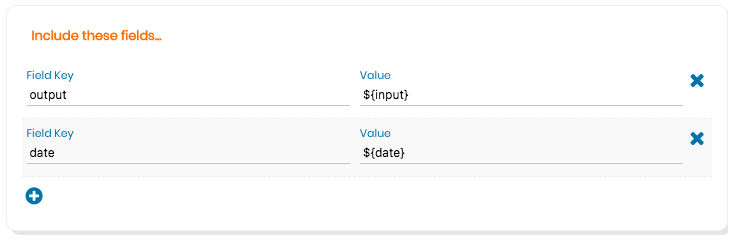
- Now let's set the format back to JSON. Now to make this JSON response useful we need to add Fields to our response. This will allow other services to parse your data in a descriptive and meaningful way. Scroll down to the section labeled “Include these fields...”. Click the plus symbol icon to add a new field to our response. Set the properties of the field as follows:
Field Key = output
Value = ${input}
- Save the process and then go back to your endpoint in your browser. Your response should now appear as:
{
	"output": "test data"
}
- If you were to set the Format to XML your response would have appeared as:
<output>test data</output>
- Quick note on XML. The field properties that you enter are not guaranteed to be in any specific order when sent through the response. This is not an issue in most cases, but with XML there are some protocols such as SOAP which do enforce a specific ordering of the DOM elements. If you are needing to send XML data in your response I would recommend that you use the template option instead of the fields. The template is guaranteed to maintain it's ordering. Conversely I would also recommend using the fields when using JSON for your responses.
Let's Transform Some Data!
- Now add a “Transform Data” action between the actions “receive call at /my-first-transform” and “successfully respond, data transform: ${input}”. Set the following properties:
Operator = then
Action = Transform Data
Description = Replace Vowels
- Your project should now appear as follows:
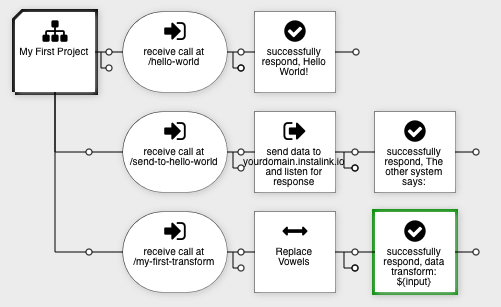
- The “Transform Data” action does pretty much what you'd suppose. It transforms the data sent into the endpoint utilizing preset transformations as well as custom scripts when needed for advanced transformations. Now let's add a new transformation.
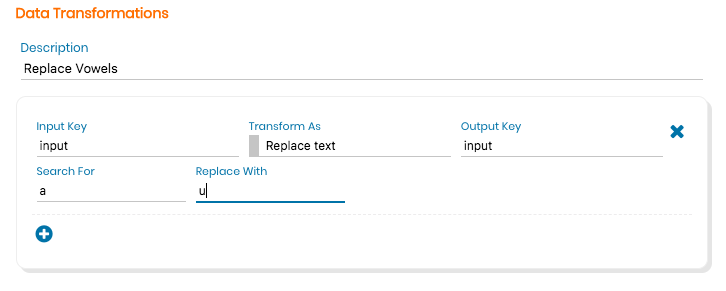
- Click on the plus symbol icon in the Data Transformations section to add a new transform. You may have guessed from the description that our new transformation is going to replace all vowels that we see in our input field.
- Set the properties of our transform to the following:
Input Key = input
Transform as = Replace text
Output Key = input
Search For = a
Replace With = u
- What this transform will do is replace the first “a” letter found with a “u”. Save the process.
- Go back to your endpoint and do the following query to see how this works in action.
https://yourdomain.instalink.io/my-first-transform?input=banana
- Your response should be:
{
	"output": "bunana"
}
- Now, “bunana” is fun, but what if you wanted all the “a” letters to be replaced? You can use regular expressions here as well. Update the “Transform Data” action as follows:
Search For = /a/ig
- Now your response should be:
{
	"output": "bununu"
}
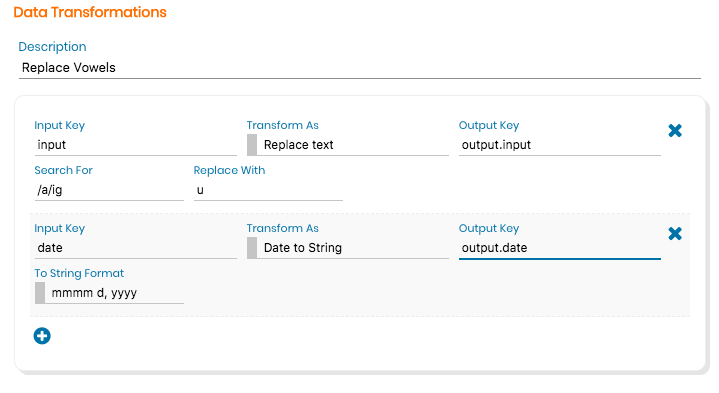
- Of course you can add multiple transformations. Let's do a date-time transformation. Go back to the “Data Transform” action and add another transform record. Set the properties as follows:
Input Key = date
Transform As = Date to String
Output Key = date
To String Format = mmmm d, yyyy

- This transform will read the data that is sent into the endpoint for the field “date”. It will parse the data as a Date object and then transform it into a string that matches the month day, year pattern that we selected from the drop down. Instalink is often greedy in how it attempts to process inputs. It will attempt to coerce the data submitted into the type chosen on the transform. It will sanitize the values only so far as necessary to ensure a proper type coercion will occur. The data will not cause the process to throw exceptions or otherwise fail due to an inability to complete it's transformation. It is up to you to handle any specific failure scenarios as needed. We'll cover that in the next tutorial.
- Save the action and then send the following to your endpoint.
https://yourdomain.instalink.io/my-first-transform?input=banana&date=2018-04-27
- You should see the following:
{
	"output": "bununu"
}
- Now hopefully you've picked up on the fact that our date field is not present in this response. This illustrates that adding fields to a transformation does not automatically add it to the response. It still needs to be declared in the response. This works in the same way that all data submitted to the endpoint, while accessible to internal processes, must be declared in any output from the process.
- Open up the “Respond to Success” action and then add the following response field:
Field Key: date
Value: ${date}
- Save this action and then run your endpoint again. Now your response should be:
{
	"date": "April 27, 2018",
	"output": "bununu"
}
Name Spacing Data
- You can create subdocuments in your data by utilizing dot notation in your field keys. For example you can set all your fields to exist in the same document. That way you won't have to update your output fields each time you add a new data transformation. You could simply reference the parent document in the output field. Let's update our transform and response to utilize this design pattern.
- Open up the “Transform Data” action and update the first transform record as follows:
Output Key = output.input
- Update the second transform record as follows:
Output Key = output.date
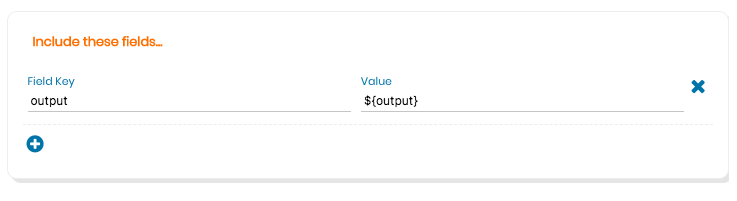
- Save those changes and then go back to the “Respond with Success” action. Delete the “date” Field record.
- Then update the output field record with the following:
Value = ${output}
- Go back to your endpoint with the following query.
https://yourdomain.instalink.io/my-first-transform?input=banana&date=2018-04-27
- You should now see “output” as a subdocument.
{
	"output": {
       "date": "April 26, 2018",
       "input": "bununu"
  	}
}
Conclusion
By now you're probably getting a feel for the interface and the design patterns that govern how data is handled within Instalink. While the examples that we did above were very rudimentary, there are many possibilities available to you. You can do very simple transforms like we did today all the way up to extremely complex Maps, Arrays and Object transforms.
We'll cover decision logic in the next tutorial.
